Transform your outdoor space with low-voltage landscape lighting

Transform your outdoor space with low-voltage landscape lighting

31 March 2024

One of the benefits of smart lighting is how easy it is to use — whether you control your lights using the Hue app, your voice, motion sensors, or smart switches. But it's also incredibly easy to set up (yes, even the outdoor lights!) thanks to the Low-volt collection of outdoor smart lights. Low-volt also offers you a versatile range of options, whether using low-voltage path lights to help guide you around your backyard, or low-voltage deck lighting to create the just the right atmosphere for any occasion. 
What is low-voltage outdoor lighting?

Low-volt is a collection of low-voltage lighting offered by Philips Hue and specially designed for your outdoor spaces. Instead of being wired directly into your home’s electricity (also called line-voltage lighting), Low-volt lights simply plug into any standard wall socket. Line voltage in North America is 120 V and 230 V in most other parts of the world. Low-voltage lighting uses a transformer to reduce that voltage.

The transformer in the Philips Hue Low-volt collection is in the Philips Hue power supply unit (PSU), which comes in two variants in Australia and New Zeland: 100 W and 40 W. 

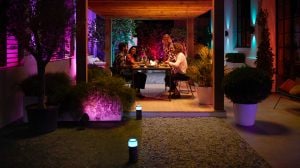
Outdoor space lit up with low-voltage outdoor lighting.

How to install low-voltage outdoor lighting?

When you set up Low-volt outdoor lighting, you'll only need three things to get started:

  • Power supply unit (PSU)
  • Low-volt light fixture
  • Cables

Note: All Low-volt light fixtures come with the necessary cables. All base units include both a PSU and the necessary cables. Check the packaging to make sure that you have everything you need to get started.

  1. Place the light fixture where you'd like, ensuring it's within 50 feet of the closest Philips Hue light in your house or the Hue Bridge.
    (Wondering why? Philips Hue smart lights form a mesh network where each light extends the Zigbee signal. If your light is too far from the nearest light or your Hue Bridge, it won't be able to communicate with your system.)
  2. Connect the extension cable between the light fixture and the PSU. If your light is located close enough to the PSU, this may not be necessary.
  3. Plug the PSU into an outdoor socket.
  4. Add the light to your system in the Hue app.
This is a very simple outdoor smart light setup to start with — but the Low-volt system means that extending and expanding is as easy as simply plugging it in.
Hands plugging in Philips Hue low-voltage outdoor lighting to a t-connector to extend a lighting setup.

Choosing the right power supply unit for your setup

When adding new low-voltage lights to your existing setup, keep in mind that one PSU can only power so many lights. To figure out how many lights you can use on a single PSU, simply add up the wattage of the light fixtures:

Low-volt setup with 40 W power supply unit

Here's an example of a Low-volt setup using a 40 W PSU and two types of lights: Lily spotlights and Calla pedestal lights. Both Lily spotlights and Calla pedestals are 8 W each, resulting in this setup:

Lily (8 x 3) + Calla (8 x 2) = 40 W

Diagram of a Philips Hue outdoor lighting setup connected to a 40-watt power supply unit.

Low-volt setup with 100 W power supply unit

Here's an example of a Low-volt setup using a 100 W PSU and three types of lights: Lily spotlights, Calla pedestal lights, and an 80-inch outdoor lightstrip. Both Lily spotlights and Calla pedestals are 8 W each, while the 80-inch outdoor lightstrip is 19 W. 

Calla pedestals (8 x 6) + 1 outdoor lightstrip (19 x 1) + Lily spotlight (8 x 3) = 91 W

Diagram of a Philips Hue outdoor lighting setup connected to a 100-watt power supply unit.

*When a bulb displays "Up to" a certain number of lumens in its specifications, it displays the maximum lumen output of the bulb. It shows how bright the bulb can get at 2700 K (White bulbs) or 4000 K (White ambiance or White and colour ambiance bulbs). Learn more about brightness